Packaging Mixture Prescriptions
When packaging a mixture, each ingredient must be scanned and a Beyond Use Date must be entered.
Ingredients marked as Supply in the Mixture Folder do not appear in the Packaging window. For more information, see Mixture Folder Main tab.
To process a prescription through the Packaging queue:
-
From the Workbench, select the Packaging queue. Prescriptions that are currently in the Package queue display in the prescription grid.

-
Select the prescription(s) that you are packaging.
-
Select Process. The prescription opens in the Packaging window.
-
Enter the following mixture information:
-
Beyond Use Date - the date beyond which the mixture should not be used. Select the NAPRA Guidelines button to open a tool that assists with determining a Beyond Use Date.
-
-
Enter the following ingredient information manually or by scanning a barcode. If a barcode is scanned, some or all of this information populates automatically. For more information about the different types of barcodes, see 2D Barcodes.
-
 Validation
A message displays under the UPC field if the UPC matches or does not match the DIN or pack size selected.

-
Lot the lot # on the ingredient. This auto-populates if the Lot Number was entered in the ingredient Drug Folder.
-
Expiry (MM/DD/YYYY) - the expiry date of the ingredient. This auto-populates if the Lot Expiry was entered in the ingredient Drug Folder.
Formatting Requirements
This can be entered with or without dashes (-) or slashes (/). Propel Rx will assume that the dates you enter are in the formats MMYY, MMDDYY, or MMDDYYYY. If you only enter month and year, Propel Rx will assume the last day of the month as the expiry date.
The format MMYYYY is not supported. If you enter 012025, the expiry date will be Jan 20, 2025, not Jan 2025.
For example:
-
0125 will be interpreted as Jan 2025 (in Workflow Details, it will appear as Jan 31, 2025)
-
013125 will be interpreted as Jan 31, 2025
-
01312025 will be interpreted as Jan 31, 2025
-
-
Qty - the quantity of the ingredient that is being dispensed. Automatically populated based on the pack size.

Only UPC and Qty are mandatory when scanning the ingredients. For tracking purposes, it is recommended the Lot and Expiry (MM/DD/YYYY) fields are also populated.
-
-
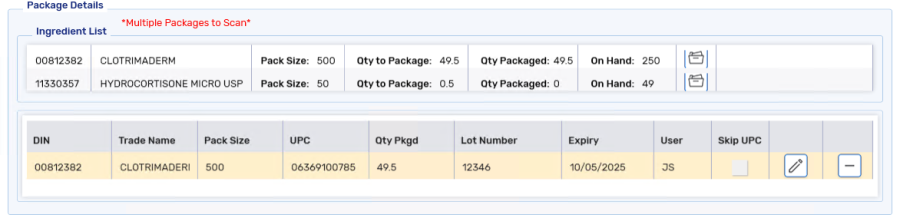
Select Add. The package information is added to Package Details. This step is completed automatically if you scanned a 2D barcode that contained the UPC, Lot Number, and Expiry information.
-
Repeat steps 5 - 6 for the rest of the ingredients.
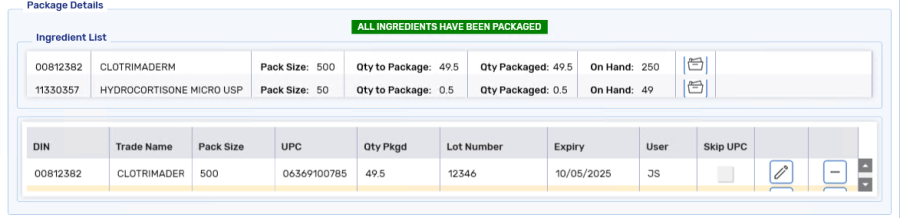
Once all ingredients have been scanned, ALL ITEMS HAVE BEEN PACKAGED displays.


If you package a prescription and then rebill it for a lesser quantity, remove the previously entered rows in the Package Details section before proceeding to package the new quantity.
Additional Scenarios
The Packaging window is a robust feature of Propel Rx, considering different scenarios your pharmacy may encounter when packaging a prescription and offers easy and efficient solutions.
Use the dropdowns below for more information.
Two-dimensional (2D) barcodes are designed to carry more information in less space than traditional 1D barcodes. Unlike 1D barcodes, which store limited data in a single line, 2D barcodes encode key details like the product's Global Trade Item Number (GTIN), lot number, and expiry date in a compact format that can be scanned in any direction. For more information on these barcodes, see 2D Barcodes Powered by GS1.
The 2D barcode scanning feature has been tested using the Honeywell and Zebra barcode scanners.
The following packaging information can be auto-populated when scanning a barcode:
-
UPC - when scanning a 1D or 2D barcode.
-
Lot and Expiry - when scanning a 2D barcode. Any lot and expiry dates entered in the Drug Folder will be overridden if the information is contained within the 2D barcode.
If after scanning a 2D barcode, all packaging information auto-populates, the Add button is triggered automatically and the details are entered in the Package Details section. If packaging more than one ingredient, the cursor's focus shifts to the UPC field for additional scans. Otherwise, if all ingredients have been packaged, you can press Enter to trigger the Package button.
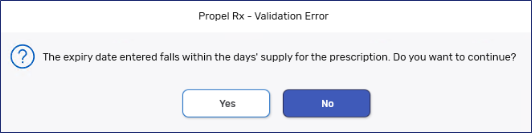
If a pack size expires within the Days Supply of the prescription, the pack can still be used. A prompt appears when the pack is added that warns users of the short expiry date. If Yes is selected, the pack is added to Package Details and Packaging can resume.
A '(Short)' indicator appears in Workflow Details beside the Expiry Date.
If a UPC is scanned or entered, and it is not the correct UPC, Propel Rx may return one of the following messages:
-
UPC does not match the DIN selected
-
UPC does not match the pack size selected
-
UPC not recognized
This could be due to the incorrect pack or bottle scanned, the wrong pack size scanned or the UPC is damaged.
In these scenarios, if you want to skip the UPC scan:
-
Scan or enter the UPC. One of the above error messages displays.
-
Select Add. A validation prompt displays.
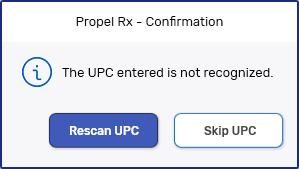
-
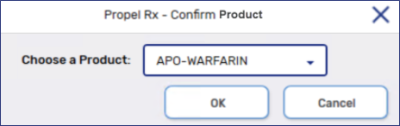
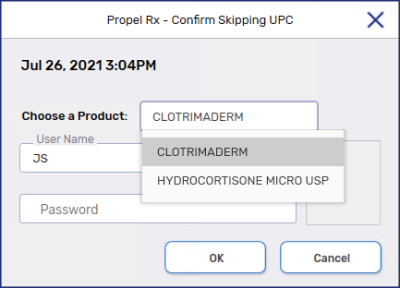
Select Skip UPC. A confirmation prompt displays.
-
From the Choose a Product dropdown, select the product that you are skipping the UPC.
-
Enter the User Name and Password, or scan the fingerprint, of an authorized pharmacy team member.
The package information will display in the Package Details with the Skip UPC checkbox selected.

Prior to completing the Packaging process, labels can be split, if required, to offer variety and flexibility when labeling prescriptions by specifying a quantity that will appear on each Vial label.
To adjust the split quantity, select the expander icon  next to the Labels field.

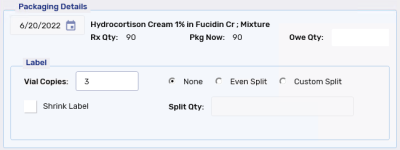
There are three split label options:
-
None - default selection. No split occurs and the same quantity appears on each Vial label.
-
Even Split - the quantity of the prescriptions is split evenly between the specified Vial label copies.
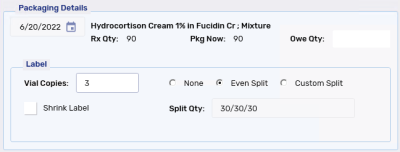
The Split Qty is automatically populated based on the quantity of the of the prescription and the number of Vial labels.
-
Custom Split - the quantity of the prescription is split based on the Split Qty entered.
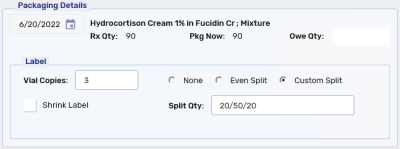
Split quantities can also be set in the Extended tab of Rx Detail. For more information, see Split Label Functionality.